To consider: should L6 come before L5 (and should they both come before L4?)? These activities seem easier than Caesar. There was also some feedback about reordering the pages in this lab. --MF, 1/10/23
Texting Time
In this activity, you’ll use reporters to transform text messages 🎉 🤩 🐱 and add your own S👏T👏Y👏L👏E👏, and you'll create descriptions of what these reporters do.
Styling Your Text Messages
Adding Program Documentation
Consider breaking this section out onto it's own page after the rest of the content on this page. --MF, 1/10/23
Programmers often write descriptions of their code (also called documentation) to remind themselves what the code does and to help other programmers read, understand, and use it.
In Snap!, you can use "comments" to document your code. If you right-click (or control-click on a Mac) the background of the scripting area and choose "add comment," you will get a comment bubble that you can drop anywhere in your code. Comments are only for reading by humans; they are not run by the computer the way code is.

Comments can be added near code, between pieces of code, or attached to pieces of code.

A comment can also be attached to the hat block for a custom block, and that text will then appear as the help text for the block. The first step is dropping a comment bubble on the hat block of a custom block in the block editor:

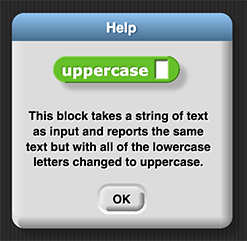
Then, when right-clicking the block and selecting "help" from the dropdown menu, you'll see something like:

- Read the help text for the
lowercase block, and then open the Block Editor for the lowercase block to see how the help text was created by adding a comment to the hat block.
-
Choose one of the four blocks for which you wrote down a description, and use your description to create help text by attaching a comment to the hat block.


- Create help text for the three remaining text processing blocks.
Export Text Messages
-
Use the output of these blocks outside of Snap! by using the
 block. Click for instructions.
- Put the block that outputs the text message you wish to export into the input slot of the
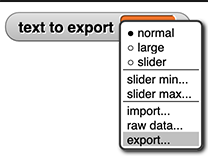
export text block, and run the export text block by clicking it.
-
Right-click the text to export watcher on the stage, and choose "export..." from the dropdown menu.

- Open the file that is downloaded, copy the text, and paste it wherever you want to use it.
Draw a Conversation
- Add a picture of what to expect. --MF, 1/10/23
- Also consider whether this block really adds much to the activity... --MF, 1/10/23
The  block takes any number of messages as input and draws as many messages as it can fit in a picture of a phone on the stage.
- Create a conversation by dragging one of your messages into the block, clicking the right arrow to add more slots for additional messages.
- Show your classmates your conversation and check out theirs. A lot can happen in a short number of messages!
In this activity, you explored several text-processing blocks, learned about program documentation, and used Snap! comments to create help text for a block.


 Experiment with the blocks. Try some messages that you might actually text to someone. Do the blocks always work like you expect, or can you find some inputs that cause them to output strange things?


 block, you might write: "This block takes a string of text as input and reports the same text but with all of the lowercase letters changed to uppercase."


 block.
 block takes any number of messages as input and draws as many messages as it can fit in a picture of a phone on the stage.
Not currently, but that could be fun to make when we have time one day! :) --MF, 10/21/21