-
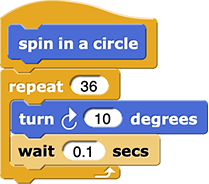
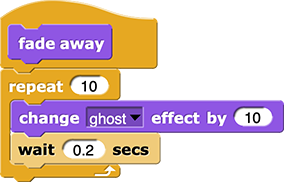
Choose at least one of your animation ideas to build now, and then click the matching link below and follow the instructions. (You will tell your program when to show your animation later. For now, you can just click the script to test it.)
Explain 4 'hidden' costume options: "can rotate," "only face left/right," "don't rotate," and "draggable"The
switch to costumeblock changes the sprite costume to the one you select in the block's dropdown menu. Thenext costumeblock changes the sprite costume to the next one on the list of costumes. Both blocks also work for changing stage backgrounds.- If you haven't already, add the costumes (or backgrounds) that you want to switch between.
- Experiment with the
 or
or  blocks (in the "Looks" palette) to understand how they work.
 - Use
switch to costumeornext costumeto create an animation.
-
Experiment with the blocks that apply to the animation style you are looking for so you understand what they do:
-
To change sprite size, try these blocks in the "Looks" palette:


- To turn your sprites, try these blocks in the "Motion" palette:


- To move sprites, there are many options. Try these blocks in the "Motion" palette first:

 What are x and y coordinates in Snap!?
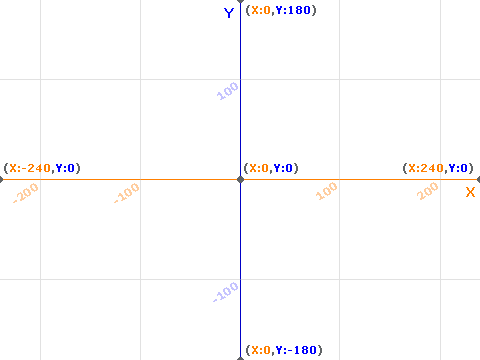
Locations on the Snap! stage (the white rectangle where sprites perform their scripts) are specified by coordinates. The center of the stage is (0, 0). The left edge is x = -240; the right edge is x = 240. The bottom and top are y = -180 and y = 180.

Maybe add: goto random, goto xy, change by x, change by y, set x too and set y to.
-
To change sprite size, try these blocks in the "Looks" palette:
-
To check the x or y position, direction, or size of your sprite, click the checkbox in the palette next to the reporter for the information you want. The value of that reporter will be displayed on the stage until you uncheck that box.


-
You'll probably want to repeat the movement (by using
repeatorforever) and to include a pause (by usingwait) so the animation doesn't happen too quickly.


-
You can use these blocks to reset the size, rotation, or position of your sprite:


- To add speech or thought bubbles, use some of these blocks from the "Looks" palette:


If you want the text to disappear after a while, use a block with "
for () secs" on the end. If you want the text to stay, use a block without it. -
To remove any previous thought or speech bubbles, use
sayorthinkwith a blank input slot:

-
To add special effects, use one of these blocks from the "Looks" palette and experiment with the inputs to get the effect you want:


-
To check the level of an effect, choose the effect from the dropdown menu of the
 block, and then click the block to report the level (100 is all the way on; 0 is off).
-
To reset one effect, use the
 block (with the effect you are resetting in the first input slot and 0 in the second input slot).
-
To reset all effects, use the
 block.
-
To make the sprite turn or move toward something (such as the mouse pointer, a random position, the center of the stage, or another sprite), use one of these blocks from the "Motion" palette, and set the input slot to tell the sprite where to point or where to go:


-
If you want the movement to repeat forever or for a certain number of times, use one of these blocks:


- To slow down the movement, use the
 block inside the
 repeatorforblock to slow it down. -
To reset position of your sprite, use this block:

- To make a sprite trace a path as is moves, use the
 block in the "Pen" palette.
 - To stop a sprite from leaving a path, use the
 block.
 - To clear all the marks on the stage, use
 block.
 -
To change the style of path drawn, use these blocks:


- Try out your animation(s) and adjust them until they work the way you want them to.


