Creating an Oscilloscope
In this activity, you will create an oscilloscope to visualize the sounds detected by your computer's microphone.
Writing Code to Draw One Set of Samples
There is a for each block at the core of the oscilloscope code. In order to draw a plot of the microphone volume intensity (loudness) over time, the sprite should go to each microphone volume sample, tracing out the intensities for each sample across the Snap! stage.

As you've seen, every time microphone (samples) runs, it reports a set of samples recorded over a brief period of time. For our oscilloscope, we want to plot that set of samples across the stage, then replace the drawing with the next set of sound samples detected, then replace it again, and so on in order to visualize the changing signal intensity over time.
Since we'll plot the samples across the stage horizontally, we need to keep track of the width each sample should get on the stage.
- Open your "Sparks-Making-Noise" project if isn't open already.
-
Create a global variable called sample width to store the width each sample gets on the stage. Set it to the width of the stage divided by the microphone resolution (the number of values in the sample set).
Why set sample width to the width of the stage divided by the microphone resolution?
Since we need to know how much space each sample gets on the stage, we need to divide up the stage width into enough pieces for all the microphone samples to fit.
-
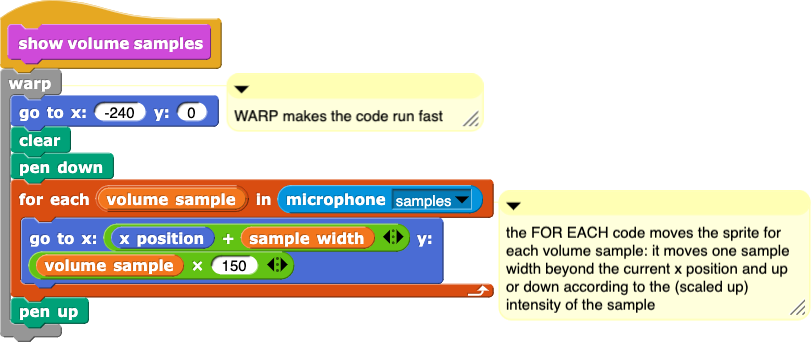
The sprite needs to draw the set of volume samples across the stage. For each sample, the sprite should move forward horizontally (the width of one sample) and move vertically to the intensity (loudness) of that sample. Create the
for each code by copying the code shown above and completing the inputs to the go to block.
Since the sprite will move across the stage throughout one whole set of samples, the horizontal movement must be based on where the sprite is already. Since the volume samples are small, you will need to multiply the intensity value by some scaling factor in order to see the values on the stage. How much you need to multiply by depends on your microphone and the sounds you make.
Click if you need an example.
- You'll need a few more blocks (such as
pen down) to make your code actually draw the samples, but first:  Discuss how this
 for each code will help your sprite draw a set of samples across the stage.
Drawing Microphone Samples Continuously
-
Now finish the oscilloscope. Create a new block
 that:
that:
The

block runs all of the code inside it quickly without taking the time to draw anything at a speed people can see.
- Moves the sprite to the middle of the left side of the stage (x = -240, y = 0)
- Clears the stage
- Puts the pen down
- Draws one set of microphone samples across the stage using the
for each code you already developed
- Lifts the pen up (so you don't draw a line across the stage when you draw the next set of samples)
- Does all of these steps quickly. Do this by wrapping all of the
show volume samples code inside of a warp block.
Try to build the code yourself, but if you need it, you can see an example here.
- Close the block editor, and put a
show volume samples block inside a forever block so that not just one set of samples is drawn, but many sets are drawn continuously.
-
Try out your code, make some noise, watch the results on the stage, and work with your partner and classmates to debug any issues. The oscilloscope should move according to the sounds you make and should look something like this:
![animation of an oscilloscope in Snap! that looks like a rapidly changing, horizontal wavey line animation of an oscilloscope in Snap! that looks like a rapidly changing, horizontal wavey line]()
-
Once your oscilloscope is working, add Snap! comments to your code so you remember how it works. What kinds of comments should you make?

-

 Without using Snap!, try to predict what will happen to the oscilloscope if you change the number in the
  input to the
 go to block. Why do you think that will happen?
- Try it out in Snap!. Try a larger value (like 1000) and a smaller value (like 25). If your prediction wasn't correct, can you explain why what you see happens?
In this activity, you built an oscilloscope that displays the intensity of the sounds detected by the microphone over time.

 Discuss how this
 that:
that:
 block runs all of the code inside it quickly without taking the time to draw anything at a speed people can see.


 input to the