Designing Your Pet
MARY TODO: revisit this lab with design standards (2-AP-10—2-AP-14, 2-AP-16, and 2-AP-17) in mind. Also:
- 2-CS-02: Design projects that combine hardware and software components to collect and exchange data. Collecting and exchanging data involves input, output, storage, and processing. When possible, students should select the hardware and software components for their project designs by considering factors such as functionality, cost, size, speed, accessibility, and aesthetics. For example, components for a mobile app could include accelerometer, GPS, and speech recognition. The choice of a device that connects wirelessly through a Bluetooth connection versus a physical USB connection involves a tradeoff between mobility and the need for an additional power source for the wireless device.
In this activity, you'll design an interactive, imaginary creature that uses the micro:bit LED display.
Collect Materials
Plan Your Pet
Your pet can be real, fictional, or an entirely new creature of your own creation. It will detect its environment using micro:bit’s sensors and inputs, and the LED display can display its respond.
As you brainstorm your Interactive Pet, consider the inputs and outputs you will want to use.
: Input and Output
In computing, the input is the action that tells the computer to do something. The output is the resulting action that occurs after the input command is received.
The micro:bit has different types of inputs: light (bright or dark), button pressed, or certain movement. The output we're currently exploring is displaying a picture on the LED display.
Your pet should respond to at least one of these inputs with a different LED screen design (output):
- Pressing a button (A, B, or both)
- Tilting the micro:bit (x, y, or z)
- Changing the light level (see L1: Meet micro:bit)
Before you start making your Interactive Pet, take some time individually to brainstorm what you want to make. Generate multiple ideas and then choose one to develop further into your project. Use the following guiding questions to help you planning process.
-
Brainstorm your creature. Think about how it spends its day or the activities it enjoys doing. Use a pencil and sketch what it will look like.

Hi Deanna, I restructured the following a bit. LMK what you think. --MF, 3/15/22
-
Write some notes about how your pet will look and behave:
- What will its body look like? What materials do you need?
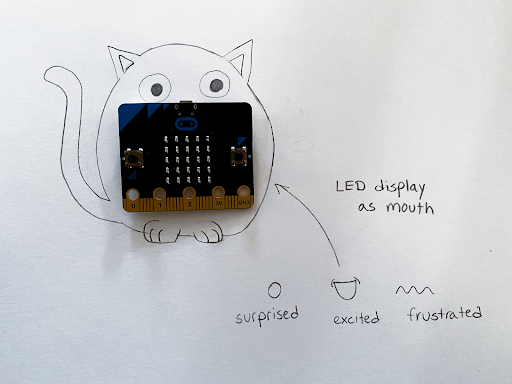
- Where will the micro:bit go? How will it be used to enhance the pet?
- What will be shown on the LED display?
We should say what the board can do so they can envision their pet. How's this? --MF, 3/20/22
You've already seen how to control the 25-LED display depending on light level detected by the micro:bit. The board can also respond to its two buttons (labeled "A" and "B"), and it can play sounds with a block that's like

.
To find this sound block, add the Library Pluck.ubl which can be found inside Sound.
Note: msec means milliseconds which is the length of time that the note will play (1 second = 1000 milliseconds).
Hi Mary, feel free to format this however you like. -- DG 4/5/22
-
 Share your ideas with a partner, and offer feedback on their plan.
- Do you have ideas for making it more interesting?
- Do you think they may run into any challenges with their plan?
I think we should take out the following because this is stuff that happens on the next page. --MF, 3/15/22
Once you have a pet in mind, start building it with the suggested supplies as well as other available materials. When ready, start making your interactive component.
In this activity, you decided on a pet to create and thought about how to make it interactive using micro:bit.


 .
.